18th c. Embroidered Waistcoats

Without question, what most people ask me for are 18th c. embroidered waistcoats. It makes sense, since that was the first truly ambitious embroidery project I tackled, and to this day, it’s still my favorite.

Last year I made a second version of the same waistcoat, this time in much more muted grey tones on white linen, to match a linen suit my client was having made. Stitching it out again made me realize that even when the end result looks great, there are many technical details that make it difficult on the embroiderer. Copyright restrictions prevent me from ever selling that design as a product unto itself, so it doesn’t make much sense at this point to go back and clean it up.

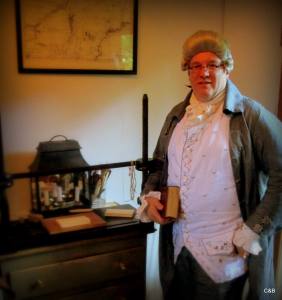
C&B Waistcoat

However, I do want to have waistcoats in my product line, since so many people have expressed a desire for them. I was aiming for Summer 2016 as a release date, figuring that 2015 would focus on smaller borders and accessories. Luckily, I get to move that up a year, thanks to a couple nudges from the universe over the last couple weeks.

First up will be something a little simpler: a late 18th c. or early Regency style waistcoat based on this pink striped linen example in the Met. I’m so excited about this one, it went into development within a day of getting the nudge to do it! The nice part about this design is that the floral motifs would be just as well suited to women’s garments or heirloom sewing, in case a waistcoat isn’t your thing.

The second one will be a more traditional 18th c. style with a slightly earlier cut, around 1770. This one is inspired by another example at the Met. This design will take a little longer to produce, since I will also be publishing a waistcoat pattern to go with it, so you can be confident that the pattern and the embroidery will match up.

I’m so excited to be tackling these projects sooner than anticipated. I really love menswear, and I love the challenge of making items like these come to life again. These will probably only be two of many waistcoat designs I will eventually offer, so that men can have some options when picking a design.  Even though the cut of waistcoats remained more or less the same, there is a lot of variety in how bold or delicate the actual embroidery was, and I want to be able to reflect that in the designs I produce.

Swimming in Swatches

No matter the type of handiwork, I’ve always hated making swatches. I do them because I know how valuable they are, but it’s still my least favorite part of a project. So of course, I decided to launch an idea that would require me to swatch things over and over and over again until they’re just right. What was I thinking??

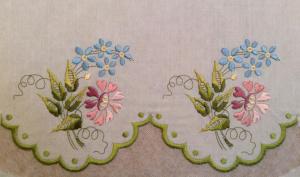
Well, mostly I was thinking about how awesome it would be to bring period embroidery designs to life in a way that didn’t make them look flat and modern. It’s been a very interesting learning curve, figuring out how to translate historic pieces into something a machine can reproduce, and it hasn’t been without a few hiccups. I know enough about good digitizing to know I don’t know how to do it myself, but most professional digitizers need some coaxing to step outside their comfort zones. Once it looks good on the computer, then comes the work of making sure it looks good in practice – and that means endless swatches, in silk, cotton, and wool threads, on a variety of cotton and linen fabrics.

This silk on cotton voile swatch was stunning...until I washed away the stabilizer and the edge collapsed.

This silk thread on cotton voile swatch was stunning…until I washed away the stabilizer and the edge collapsed. Working on potential fixes, because this is gorgeous on sheer fabric!

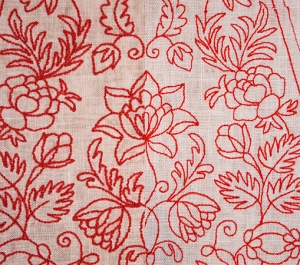
As you might expect, some combinations work better than others, or look more period.  For example, take a peek at the same pattern in both silk and wool.  What a difference, right?

Wool on the left, silk on the right.  Can you see the difference in texture?

Wool on the left, silk on the right. Can you see the difference in texture?

It’s helped me discover issues – for example, cutwork on linen doesn’t act the same as cutwork on cotton voile.  I’ve also learned, and been frustrated by, the fact that some color ranges are available in some threads but not others. So my beloved yellow-greens are readily available in silk and wool, but ridiculously hard to find in cotton. Some colors that look great on the spools just look garish or clash when stitched out together. With each new discovery comes a new swatch or two… or five.

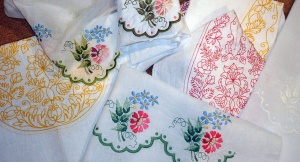
Just a few of the swatches so far.

Just a few of the swatches so far.

The good news is that although I’m long past my original target date, I am getting close to having something to publish. I’m also thinking ahead to the next few patterns.  So far I’ve only worked on 18th c. and Regency era designs for women, but I’d like to expand my range to include earlier pieces as well as some items for men, like pocketbooks and caps.

Tall Hat, part 2

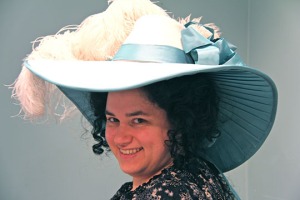
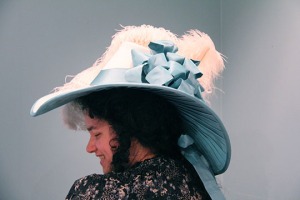
It’s been fun to make this hat and brush off my millinery skills, so much so that I’ve been spending a lot of late nights in the studio working on it, even though I don’t plan to wear it before late June. As a result, I finished it much sooner than I expected!  I took advantage of having Holly around during daylight hours to get some shots of me wearing the hat, so that you could see the scale of it on a real person. It definitely ended up big!

Front view

Front view

Side view

Side view

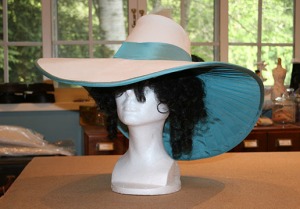
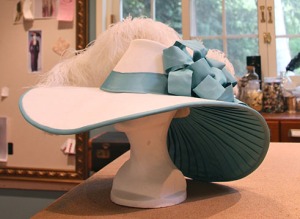
I don’t really have progress photos between the mulled frame and the completed hat, partly because the change from ivory batting/flannel to white velvet wasn’t really dramatic enough to bother taking pictures of, and partly because I got caught up in the work and forgot to stop for pictures. The top of the hat and crown are covered with white cotton velvet, and the underside with aqua silk taffeta, with more taffeta binding the edge of the brim. Here is it after assembly but before most of the trim was put on. I opted to pleat the underside of the brim, even though I could have saved some hours by using a flat lining. I am happy with the finished effect, however, and glad I put in the extra time.  I also fidddled with the hat band for hours, trying to figure out the best way to cut it out and stitch it on, and ended up with a shaped band barely stitched down at all. It was the only way to have it lay smoothly across the crown and not distract from the shape, which I wanted to show off as much as possible.

Assembled hat, before trimming.

Assembled hat, before trimming.

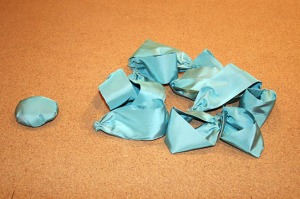
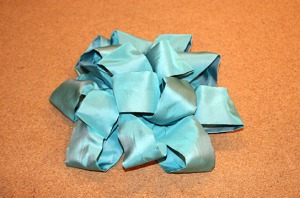
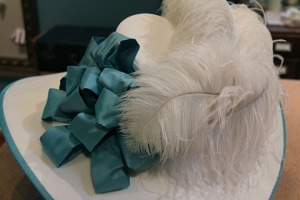
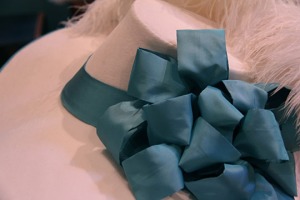
I figured a floofy bow and some feathers were the obvious choice for trim, but they needed to be big enough to suit the hat. I wanted something full like the bow on this hat, which I ended up constructing of 2″ wide tubes of silk, to match the width of the band at the base of the crown.  After playing with the silk for a while, it was obvious that the large loops I was making would need some extra support, so each one is individually wired and gathered. The wire isn’t very noticeable, but gives just enough support to keep some fluff in each loop. Each loop was stitched to a circle of buckram, padded and covered with a scrap of silk. This gave me something to stitch the loops to firmly, as well as a bit of dimension to build the bow around.  It also means the finished bow could be stitched to the hat itself with a minimum of stitching, which in turn meant less handling of the hat during construction.

Padded buckram circle and individually wired bow loops.

Padded buckram circle and individually wired bow loops.

Big loopy bow ready to attach.

Big loopy bow ready to attach.

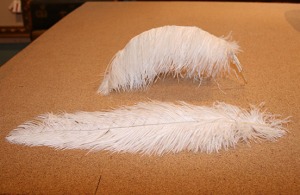
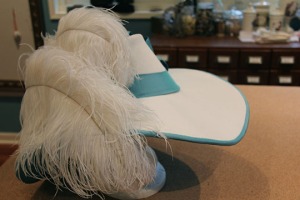
I also spent some time building the feathers into something lush enough for this hat.  I used three ostrich “plumes” in total, each made up of three feathers pulled from an assortment of 18-24″ plumes and 17-19″ drabs. The first was a 24″ long beauty of an ostrich plume which had a graceful natural curve to it, backed with two slightly damaged plumes. Then I built two shorter “plumes” from 17-19″ drabs topped with a shorter, less pretty plume. Each was then shaped and steamed and fluffed before being attached to the hat. The longest plume wraps around the back of the hat, arches up, and droops delicately over the edge of the brim, where the tip of the plume is secured with a swing tack so it can move, but not too far.

One drab out of the package, and three drabs sewn together, shaped and steamed.

One drab right out of the package, in front, and three drabs sewn together, shaped, and steamed, in back.

I set the feathers and the bow fairly far back on the hat, to keep most of the tall sloped front of the crown visible. I placed the bow about halfway up the crown, rather than flat on the brim. The feathers were arranged so that the two largest sweep around to the side opposite the bow, and the final one crosses over the back of the hat in the other direction. I may eventually add some other trim in the back, but for now I am really pleased with how it turned out! The inside is lined simply with white taffeta and a grosgrain band.

Finished hat from the front.

Finished hat from the front.

Feathered side of the hat.

Feathered side of the hat.

Back view.

Back view.

Bow detail.

Bow detail.


18th c. Tall Hat

I love really enormous hats, but have never actually owned one.  Well, I did try to make one years ago, but it wasn’t exactly a success and it got crushed in the process of a couple moves, so it seemed like a good time to try again.

Last year after Costume College I picked up some delicate silk and cotton sheer fabric in an aqua and white stripe, some aqua silk taffeta to match, and some vintage grosgrain and velvet ribbons to trim a potential hat.  At the time I wasn’t sure if I would go late 18th c. or 1910’s, but either way I envisioned something with a sash and a big hat. I don’t really do 1910’s, and I love 18th c., so I finally decided to use the stripe for an 1780-90’s open robe and make a giant hat to go with it.

I really love the curved shapes of these hats, as well as slightly sloped tall hats like these, so decided to combine the two.  As a starting point, I used the pattern for my Renaissance tall hat, which is slightly sloped top to bottom as well as front to back. Just as a guess, I widened the brim 6″ all around. After making up a paper mock up in tag, I ended up scaling it back just slightly, taking 1″ off the sides and 1/2″ off the front. The existing measurements on the sideband of the crown and the head opening on the brim didn’t quite match up, so I enlarged the brim opening, making the oval slightly wider at the back than at the front. It wasn’t my intention, but I liked the way it looked and thought it enhanced the fact that the crown is also taller in front.

Any hat needs some wire for structure, but one this large was going to need a LOT of structure. In one of my books two methods are listed. 1) a continuous piece of wire bent back and forth around the brim, or 2) smaller loops of wire attached at the edge of the brim and at the head opening. Method 2 is what I used on my first big hat, since it seemed easier and maybe used a little less wire.  I was always unhappy with how it turned out, however, since there were lots of poky ends of wire and I felt like every join acted like a hinge, allowing the hat to flex in ways I didn’t want it to. So on this hat, I tried the method with one continuous piece of wire.

I felt like I should lay out all the wire and get it bent into shape before zigzagging it onto the brim. However, millinery wire is springy, this is a lot of hat, and I couldn’t predict exactly where my bends should be until I was right on top of them, so I ended up just winging it while stitching it down. I did take care to keep the wire as flat as I could, although getting the brim through my sewing machine sometimes meant I had to bend things more than I liked. Still, it turned out more or less flat, and I was happy enough with the somewhat irregular wire placement. Next time I think I’d pencil in some guidelines instead of completely winging it, but I think (hope) this will work just as well. I’m not 100% sure I like the shape of the brim in the front – at some angles I love it, and others it looks clunky, but since it’s already wired, I’m not changing it!

With the brim wired, I decided to start to bend it into shape before I covered it with anything. While you can shape a hat somewhat after construction, I wanted to make sure I had enough ease in the outer fabric that it wouldn’t strain after I shaped it.  This shaping also led me to a patterning decision I hadn’t yet considered – do I shape the sideband of the crown or leave it flat?  It’s really hard to see the join between the crown and brim in most illustrations, because there is so much decoration on the hats. This one shows the crown deeper in the front and sloped up along with the brim at the sides, but plenty of others look like the crown could also be a straight line all around. The difference is somewhat subtle – the outer edge of the brim can be shaped into a curve either way, but it will either continue the curve all the way to the crown if the crown is shaped, or flatten out as it reaches the crown if the crown is straight.  I decided that curving the crown would help support the structure of the curve I was building into the brim, rather than possibly fighting against it and/or weakening the join between the crown and brim.

Luckily, the sideband is the piece not already wired, and it was easy enough to change the shape before I got any further. I ended up raising it almost 1″ at the sides, blended in at the front and back. I had the forethought to measure it again and found that this change shortened the circumference of the bottom edge by 3/4″.  This meant that the previous sideband I had cut out could no longer be used, but cutting a new piece was simple enough at this stage.

From there it was easy enough to join the new sideband to the tip, and get the frame ready to be covered. Since the extra wire would be on the underside of the brim, I decided to mull this side with a layer of cotton batting to help hide the lines of the wire. The top side of the brim and the crown will be covered in velvet, and could do without mulling, but I think a layer of cotton flannel makes the velvet look a little more plush without blurring the edges of the hat as much as the batting would. I also used cotton flannel for the bias around the wired edge of the brim and top of the hat.

Now I just need to get it covered in the outer fabrics and decide on trim. Here’s the construction so far:


This slideshow requires JavaScript.


The calm before the storm

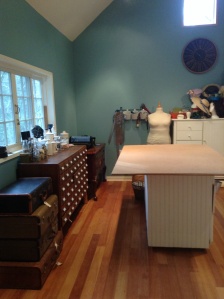
image


I took some time last week for a thorough spring cleaning of the studio. It’s amazing what odds and ends linger in strange places long after a project has ended, and it felt good to get everything back into it’s proper place and all the surfaces cleared off. We also moved in a new piece of furniture – an antique cedar chest that belonged to my wife’s grandmother – so we had to do some trial and error to figure out where it fit best. In the photo you can see it in the back left corner.

So now that everything is cleaned up, it’s time to make a mess again! This is going to be a very busy spring in the studio, with many projects lined up. Here is the current to-do list:

Embroidery – I’ve been working on a line of machine embroidery designs that are currently in the testing phase, and which I hope to release for sale this spring. That means lots of stitching out, making samples, and taking pictures. As well, I have an 18th c. man’s waistcoat of white linen that I am embroidering with a floral design in shades of grey and white.

Client projects – I am working on several big projects for a client. On the list are a WWI ambulance driver’s uniform and nurse’s uniform, a 1912 silk suit and all the underpinnings, and some early 1920’s lingerie.

Costume College projects – I’m also thinking ahead to this year’s CoCo, especially since last year’s weight loss means my closet is empty! On my list are 1830’s underpinnings, a day gown to match a lovely red bonnet I have, and crazy hair to wear with the underpinnings for Sunday undies. I also plan to make a new 18th c. chemise gown and open robe, new stays, and a fabulous new hat. I have a partially-completed pink silk striped gown and raspberry pink petticoat that would be nice to finish for the gala.  If time allows, I’d like to finish a 1950’s day dress and a Gatsby-inspired day dress to wear to classes (and summer picnics!) We’ll see how far I get on this project list, since they have to work themselves in around everything else.

I’m really excited about this list, and as luck would have it, some projects tie in nicely with this year’s Your Wardrobe Unlock’d competition. I hope to have better luck blogging this year’s projects, since they aren’t secrets, rush jobs, or boring renovations of costumes I didn’t originally make.

Costumes for Sale

I am such a sporadic blogger that I don’t know if anyone is even still reading along.  However, I am selling off some of the sample pieces I’ve featured here, and I wanted to spread the word to anyone still following.  Time to clean out the closets and make room for new projects!

NOTE: Most of these are prototype garments and may be slightly flawed. All garments have been worn 2-5 times. I’m happy to discuss details if you have any questions/concerns. All sales final.

Regency Gentleman

Men’s Regency grey wool coat lined in black silk, blue silk waistcoat, and black wool breeches. Made to fit measurements Chest 38, Waist 34, Seat 40, Sleeve 32 1/2. $400

Small issues with lining on coat, lapels on waistcoat, knee bands on breeches.

This slideshow requires JavaScript.

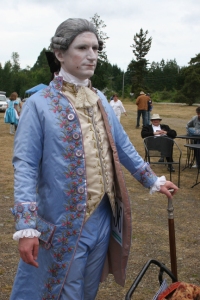
18h century Court Suit

18th c. court suit of blue silk taffeta with pink silk lining, embellished with machine embroidery and silver spangles. Coat and breeches ONLY. Waistcoat not for sale. Made to fit measurements Chest 38, Waist 34, Seat 40, Sleeve 32 1/2. $600

Issues with sleeves (mostly hidden), small issues with lining, breeches need closure added at the knee, small flaws in embroidery.

This slideshow requires JavaScript.

Regency Stays

Regency corded stays with wooden busk and embroidery. Cotton sateen over coutil. Mix of cording, flat steel and spiral steel for support. Measurements when worn with 3″ gap at back: 51-45-54. $350.

Prototype garment, some changes were made during the process and show needlemarks/wear where stitches were changed, most noticeably right below the busk.

This slideshow requires JavaScript.

Renaissance Woman

Renaissance upper middle class brown wool doublet with velvet ribbon and handmade trim, slashing, and handmade buttons, lined in burgundy silk. Matching open skirt of burgundy silk with cartridge pleated waistband. Doublet and skirt ONLY. Approx measurements Bust 48, Waist 40. Skirt hemmed for someone 5’4″, but hem could be let down. $500

Slight repairs needed on button placket. Nothing wrong with this one except the size!

This slideshow requires JavaScript.

Lady’s Victorian Ensemble

Victorian blouse of sheer sprigged muslin lined in cotton, and pink linen walking skirt lined with cotton and interlined with crinoline. Made to fit measurements 52-40-56, and hemmed for someone 5’4″. Hem cannot be lengthened easily. Lace jabot not included. $350

A few loose stitches in the lining of the blouse. Nothing wrong with this one except size. Made with Truly Victorian 1893 Blouse Waist pattern and Laughing Moon Walking Skirt pattern.

This slideshow requires JavaScript.

Progress!

The black silk petticoat is finally completely sewn, and is now just awaiting the remaining ribbon embellishment. Such a relief! It has been put aside temporarily so that I can work on other things.

Up next: late Victorian wear for 3, due in 3 weeks.  Yes, that is panic you hear. I’m not entirely sure how I let the time slip away. Oh, yeah, in ruffles and other projects!  Anyway, it’s personal sewing and keeps taking the back burner to other things, but now it’s crunch time.  I have a walking skirt cut out and waiting to be assembled, and a knickerbocker pattern drafted and waiting for a mock-up. I’m hoping to have those, and more, finished by the end of the week.

I am also beginning a class on 18th century stays this Saturday.  Only 4 students this time, so no back-to-back teaching for me!  I really loved teaching the corset class, and apparently my students loved it, too, since 3 of them returned for this class.

My first article for Your Wardrobe Unlock’d was published this week, on menswear during the period from 1730-60.  I was honored to be asked to write it, and am looking forward to writing another article this fall.

And – perhaps most exciting of all – I have proofs for my new website design and am so in love! I can’t wait unti it is up and running and I can share it with everyone. I’m hoping to have it up and new business cards printed before Costume College.

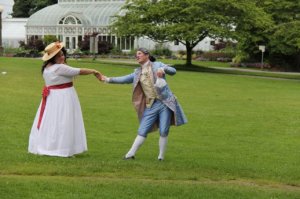
I did take time for an outing to the park last Sunday for a lovely game of croquet with friends.  It was a fun break, but now it’s down to business.  Here’s one of my favorite photos from the day, of Chris and I being silly in front of the conservatory.

Denise and Chris at Volunteer Park Conservatory

Two steps forward, and one back

I locked myself out of the sewing studio for a few days, which meant no sewing at all aside from some hand-sewing I had in the house.  I finally had more keys made and a long weekend home alone, so I designated it an all-sewing weekend, and invited over a couple of friends.

My plan was to finish the black silk petticoat and get started on the Victorian outfit I plan to wear for croquet next month. I had new patterns and thread and other goodies just waiting to be used.

The petticoat was supposed to be a quick and easy project.  A simple pattern, a few ruffles, some lace, and done. The ruffles set me back for a while, but I was finally past that. All that it needed was the last of the lace sewn on, and for the finished yoke to be sewn to the finished ruffle. One seam. Easy, right?

Not so much. The seam did go together and was neatly finished, and I had a finished petticoat.  I went to try it on and was horribly disappointed. It was short. Inches too short. Also, it was all out of proportion and just looked awkward and unflattering. Uh-oh. How did such a simple project turn out so wrong?

First, the length issues are all me. I was matching the length to an existing petticoat, the one I wore for my wedding.  The two petticoats were exactly the same length, so it wasn’t an error in patterning.  After trying on both of them, I realized the wedding petticoat is just as short, and I had never noticed. The drawstring waistline and weight of the ruffles mean it rides lower than my actual waistline, no matter how firmly I tie it, and the train means that length is only an issue at the very front.  The fabric is a soft, thin taffeta, whereas the black silk is very crisp, so each petticoat also hangs very differently.  So while I perfectly matched the length I was aiming for, I really needed to add about 4″ to the black silk.

After discussing it with my sewing buddy, I considered taking out 2 of the 5 tucks, gaining a quick 2″ of length with minimal effort. However, that meant talking about the real problem with this petticoat: the proportions.

The pattern illustration shows a deep ruffle with a narrow band of small tucks along the bottom edge, with a narrower ruffle below that. The tucks take up maybe 1/5, or less, of the space on the deep ruffle, and the narrow ruffle appears to be about 1/2 the depth of the deep one.  It’s adorable.

The actual pattern creates a deep ruffle with 5 widely-spaced 1/2″ wide tucks at the bottom edge, which take up a significantly larger portion of the ruffle.  I was also expecting pintucks or 1/4″ wide tucks from the illustration, so they are much wider and much more widely spaced than I was expecting.  The narrow ruffle is also only 1/4-1/3 the depth of the deep ruffle, so those proportions look very different, as well.  I went with it because I didn’t want to recalculate the length and re-mark the lines and cut new fabric, and maybe it would look fine when it was done.

It’s “just” a petticoat, it was going to be lacy and ruffled like I wanted, so I tried not to be bothered by the difference between the illustration (and my vision) and reality.  Once it was together and on me, it was too obvious to ignore – it was frumpy and unflattering, and that wide ruffle was out of proportion to everything else.  It really needed to be shorter, and taking out tucks would only make it deeper. So much for an easy fix.

So what was left to do but take scissors to all of it?  OK, not all of it, but at least to the ruffle.  Since it needed to be shorter and the yoke needed to be longer, cutting it off the existing yoke seemed the fastest way to making progress again. But taking scissors to a pile of silk that is perfectly finished and 98% complete is sheer torture.

So now the deep ruffle is shorter by a couple inches, and the yoke is longer by quite a few inches, and everything is ready to sew together again. Is it still progress if you end up back where you started?

I hope to finish the petticoat today, barring any other major issues.  In the meantime, I did make some other progress this week:

  • The early 1900’s princess slip has been washed to remove all the stabilizer, and is ready for a final pressing and some ribbon. I’m really pleased with how it turned out.
  • Ditto for the silk corset cover that coordinates with the wedding petticoat.
  • The Armistice blouse was almost finished, but the sleeves I cut out (how many years ago?) were not anywhere close to the right size for me. I think the style is meant to be a little long, but these are just too long, and too full, and very unflattering. Luckily, I have more of the cotton lawn I used, so I just need to cut out new sleeves and then finish the hem and buttonholes. I don’t love this blouse on me, but it is very sweet and dainty and has so much work and lace in it that I really feel I should finish it and try wearing it.
  • The blue silk men’s court suit had sleeve issues, so we tackled that problem this weekend.  Lots of patterning later, we have a sleeve with an actual sleeve cap! Imagine that.  Some careful cutting and piecing of the old sleeves should make it just barely possible to cut the new sleeves from the same fabric, since there is absolutely nothing left of that silk. I still don’t know where we went wrong originally, but I’ll be so glad when I can finally call that project complete.
  • I spent a fair amount of time washing and measuring the cotton print I hoped to use for my new Victorian outfit, and was totally in love with the pink-and-green dress I had in mind.  Unfortunately, it turns out I can’t use the fabric after all, so I had to dig through my stash and see what else might work.  For now, it looks like some dusty rose linen for a skirt, and leftover Regency gown printed cotton for the blouse. It’s very different than what I wanted, but it will be pretty and slowly I am coming around to the change. I still need/want a pink and green dress, so I guess I’m on the lookout for new fabric.

Shoes!

We have been eagerly awaiting the pre-order for the American Duchess Devonshire shoes.  We really lusted after the Georgianas, but satin and the frequently wet Seattle didn’t seem like a good match.  Most of our events are out-of-doors, so we waited.  And now it’s time!

From the American Duchess page:

The Devonshires are a leather 18th century shoe based on museum examples from the 1760s through 1780s.  They’re made of top-grade dyable leather, with a beautiful, smooth Italian leather sole for dancing, and are hard-wearing, water- and mud-proof, for even the toughest of outdoor re-enactments.

Pre-Order the Devonshires through August 10, and get the special $100 price.  We’re only making 200 of these shoes, so don’t miss the chance to own one of only a couple hundred pair on the planet!  Visit www.american-duchess.com to order.


So if you need (or simply lust after) some pretty shoes for re-enactment, be sure to check them out.

Croquet in Costume

We played  in a charity croquet game on Sunday, and the teams were encouraged to wear costumes.  Uhh… OK!   Here’s the team in 18th century garb, including the newly finished court suit.  Yes, Chris is a bit overdressed for croquet, but everyone loved it.


Our team for croquet: Zoe, Denise, Chris, Holly, and baby Z.

A shot, upon our arrival at the croquet field:

Chris certainly knows how to make an entrance.

More pictures of the suit to come.  All we got on Sunday were outdoor action shots.

Luckily, this particular taffeta does not water spot.  It drizzled on and off on Sunday, and there was a moment of panic, but it all turned out all right.  Next up – a more practical suit for Chris.